If you create a graphical webpage, you may be in need of several buttons. Normally, these buttons look alike, except of their text, and this is where later on Corel Skript is of help if you once created a design. The script language is like Basic (you could even create exe's with it).
Let's first create a typical button. Create a new small picture and start the skript recording. When you're not very sure what the exact design will be or how to get to the final version, try to find the right way and repeat that a second time while recording.
Something you need to remember when recording is that certain things won't work repeatedly. For example, CS has some problems when it's started without a picture already opened. Also, you shouldn't directly move a font, but move it by things like center, center left and so on. And don't directly draw on the picture with a brush because this will make the script really big. Try to use rectangles with filling and so on.
When a design is done, save it as a script. Now you can include it in a bigger script and replace the text entered for the design recording by a variable. This script can now be accessed by a loop, where only the text variable will change. The text variable can also be used as a filename.
With a final script (you should put it in the default script folder so you can make a button out of it to include in the Corel PhotoPaint menu) you can have all the designs so far created to choose from. You can put them in a selection list. For a graphical selection list, you create a bitmap sample of each of the designs.
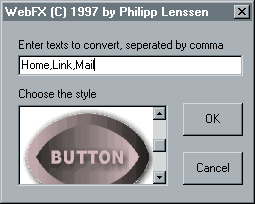
Here's how the selection menu looks in the script, but you can create those mostly visually. Note the entry "button" as used later in the selection menu sample. Now the preview array links to the bitmap files, and the choice variable will be the design number chosen, in this example 5 for button. The content variable returns the text entered.
global tool(9) as string
tool(1)="header"
tool(2)="dolphin"
tool(3)="sky"
tool(4)="heaven"
tool(5)="button"
tool(6)="struct"
tool(7)="intern"
tool(8)="black"
tool(9)="leo"
'..

preMax%=ubound(tool)
dim preview(preMax%) as string
'..

for n=lbound(preview) to ubound(preview)
  preview(n)=tool(n)+".bmp"
next

BEGIN DIALOG Dialog1 166, 110, "WebFX.."
  IMAGELISTBOX  10, 51, 100, 50, preview, choice
  TEXT  10, 40, 80, 10, "Choose the style"
  TEXTBOX  10, 20, 150, 13, content
  TEXT  10, 10, 148, 10, "Enter texts.."
  OKBUTTON  120, 50, 40, 20
  CANCELBUTTON  120, 80, 40, 20
END DIALOG
if dialog(dialog1)=2 then end ' cancel
When you want to have animated buttons to include them into a JavaScript, you might want to have the script create two versions of the button. With Corelscripts file I/O functions you can even put out the necessary HTML code you need for the onMouseOver animations.


